
Microsoft Office 2007 introduced users to two new navigation features the “Ribbon” and the “Office Button.”
The Office Button
The file menu has been replaced by the Office Button, which can be found in the upper left hand corner of the screen.
Click the Office Button to see all the familiar commands from the file menu. Whenever you see an arrow to the right of a command it means that there are more options available.
Navigating the Ribbon
The Ribbon section of Microsoft Office 2007 is made up of a series of tabs that include commands, buttons, and galleries. Each tab contains a set of commands to use for the particular tab function. For example, the Home tab includes functions such as font type and paragraph settings.
Monday, August 25, 2008


Wednesday, August 20, 2008
Tip #29: Beginning of the Semester Tasks
Beginning of semester tasks:
1. Enhance course design and menu options.
2. Combine multiple course sections into one shell (if applicable).
3. Make the course available.
Completing the beginning of semester tasks:
Enhancing the course design and menu options
1) Access your course
2) Click the Control Panel link
3) Click Course Design
In the Course Design area, you can choose a course menu design, manage how the menu is displayed, manage the tool panel, and add/change the course banner.
4) Return to the Control Panel and click Manage Course Menu
5) To re-arrange the order of menu items, click the number next to an item and select a new number order for the item
6) To modify or remove a menu item, click the Modify or Remove button next to an item
7) To add a content area, link to a course tool, a link to a course area, or an external link to the course menu, click the appropriate button at the top of the page
8) Click OK
Combining multiple course sections into one shell (if applicable)
1) Access the course from which you want to move users
2) Click the Control Panel link
3) Under the Course Options category, click Course Copy
4) Click Copy Course Materials into an Existing Course
5) Type or Search for the Destination Course ID (the Destination Course is the course to which to enrollments will be copied)
6) Place a checkmark next to Tasks and next to Enrollments
7) Click Submit; you will receive an email notification when the enrollments copy is complete
Making the course available
1) Access the course you want to make available
2) Click the Control Panel link
3) Under the Course Options category, click Settings
4) Click Course Availability
5) Select Yes
6) Click Submit
1. Enhance course design and menu options.
2. Combine multiple course sections into one shell (if applicable).
3. Make the course available.
Completing the beginning of semester tasks:
Enhancing the course design and menu options
1) Access your course
2) Click the Control Panel link
3) Click Course Design
In the Course Design area, you can choose a course menu design, manage how the menu is displayed, manage the tool panel, and add/change the course banner.
4) Return to the Control Panel and click Manage Course Menu
5) To re-arrange the order of menu items, click the number next to an item and select a new number order for the item
6) To modify or remove a menu item, click the Modify or Remove button next to an item
7) To add a content area, link to a course tool, a link to a course area, or an external link to the course menu, click the appropriate button at the top of the page
8) Click OK
Combining multiple course sections into one shell (if applicable)
1) Access the course from which you want to move users
2) Click the Control Panel link
3) Under the Course Options category, click Course Copy
4) Click Copy Course Materials into an Existing Course
5) Type or Search for the Destination Course ID (the Destination Course is the course to which to enrollments will be copied)
6) Place a checkmark next to Tasks and next to Enrollments
7) Click Submit; you will receive an email notification when the enrollments copy is complete
Making the course available
1) Access the course you want to make available
2) Click the Control Panel link
3) Under the Course Options category, click Settings
4) Click Course Availability
5) Select Yes
6) Click Submit
Wednesday, August 13, 2008
Tip #28: Discussion Board Changes
In response to faculty and student feedback, some of the features of the discussion boards have changed.
What changes will I see in the Discussion Boards?
You will see improvements to the Discussion Boards. Users will have the option to mark posts as “read” by selecting threads and clicking a Mark as Read button. Users can also see the number of unread posts in a forum and click the number to view those posts.
Users will be able to choose a view setting for their Discussion Board: Tree View or List View. The List View is the view setting currently available in Blackboard. The Tree View is similar to the view setting that was previously available in Blackboard before 2008.
Instructors can enable new discussion forum settings. Instructors can enable tagging, which allows users to tag discussion posts with searchable keywords. Instructors can allow users to subscribe to discussion forums and/or discussion threads. Instructors can also enable replying with a quote, which allows users to embed a quote from the discussion thread to which they are replying.
What changes will I see in the Discussion Boards?
You will see improvements to the Discussion Boards. Users will have the option to mark posts as “read” by selecting threads and clicking a Mark as Read button. Users can also see the number of unread posts in a forum and click the number to view those posts.
Users will be able to choose a view setting for their Discussion Board: Tree View or List View. The List View is the view setting currently available in Blackboard. The Tree View is similar to the view setting that was previously available in Blackboard before 2008.
Instructors can enable new discussion forum settings. Instructors can enable tagging, which allows users to tag discussion posts with searchable keywords. Instructors can allow users to subscribe to discussion forums and/or discussion threads. Instructors can also enable replying with a quote, which allows users to embed a quote from the discussion thread to which they are replying.
Friday, August 1, 2008
Tip #27: Creating Assignments
Tip: You can create Assignments to which students will submit their work.
Here’s how to do it:
Navigate to the content area to which you will add your Assignments. For example, if you want to add your assignments to the Assignments content area, click the Assignments link on the course menu.
Click the Edit View button at the top right corner of the page. Click the drop-down menu next to + Select: and select Assignment. Click Go.
Name the assignment, type the points possible for the assignment, and type instructions for students. You can also attach a file for students to download. Select the dates you want to make the Assignment available and click Submit. NOTE: A Gradebook column for the Assignment will automatically be generated.
Assignments versus Digitial Dropbox:
We recommend that instructors use the Assignments feature, rather than the Digital Dropbox, to collect students’ work. Some benefits of using the Assignments feature are:
· The Assignments feature generates a Gradebook item. This means that, when students submit work to an Assignment, a completion indicator (!) is placed in the Gradebook column for that Assignment. Students’ submitted work can be viewed and graded within the Gradebook. Students’ assignments can be downloaded all at once and saved to the instructor’s computer, for grading at a later time (see Tip # 20).
· The Assignments feature is intuitive and easy for students to use. To submit their Assignments, students click the View/Complete Assignment link underneath the Assignment name and description. Students can then attach their files and click Submit to complete their Assignment.
· Instructors can provide feedback with students’ grades using the Comments box or by attaching a file for the students.
Want more information?
Step-by-step tutorials are available at: http://www.twu.edu/blackboard/Bb72Tutorials.asp
Visit our website: http://www.twu.edu/blackboard,
or call: (940) 898-3706
Wednesday, July 23, 2008
Tip #26: Using tables to organize VTBE content
Tip: Use tables in the Visual Text Box Editor (VTBE) to organize your content and images.
Here’s how to do it:
Navigate to a content area in your course (e.g. Course Documents) and click the Edit View link in the upper right-hand corner of the page. Click the + Item button to add a new item. Name the item and then click in the text box below. This is where you will add your table.
On the Visual Text Box Editor (VTBE), click the Create Table button.
Select the number of columns and rows for the table. Click Submit to add the table to the text box.
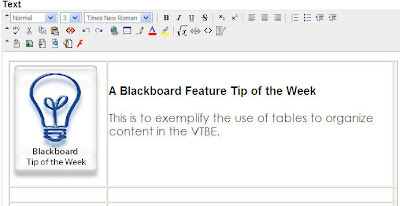
Add text or images to your table. After you have added your content, click the Submit button to save your content. Below is an example of how you might use tables to organize your content:
How to remove the table outlines:
To remove the table outlines, you will need to modify the HTML code for the table. Click the < > button on the VTBE to open the HTML view. You will see the following format code for the table:
Here’s how to do it:
Navigate to a content area in your course (e.g. Course Documents) and click the Edit View link in the upper right-hand corner of the page. Click the + Item button to add a new item. Name the item and then click in the text box below. This is where you will add your table.
On the Visual Text Box Editor (VTBE), click the Create Table button.
Select the number of columns and rows for the table. Click Submit to add the table to the text box.
Add text or images to your table. After you have added your content, click the Submit button to save your content. Below is an example of how you might use tables to organize your content:

How to remove the table outlines:
To remove the table outlines, you will need to modify the HTML code for the table. Click the < > button on the VTBE to open the HTML view. You will see the following format code for the table:
To remove the table outlines, you will need to modify the HTML code for the table. Click the < > button on the VTBE to open the HTML view. You will see the following format code for the table:

In the part of the code that says “border=1”, change the 1 to a 0. Click the < > button again to switch back to your standard view. You will see that the table borders have disappeared. Click Submit to save your changes.
Want more information?
Step-by-step tutorials are available at: http://www.twu.edu/blackboard/Bb72Tutorials.asp
Visit our website: http://www.twu.edu/blackboard,or call: (940) 898-3706
Step-by-step tutorials are available at: http://www.twu.edu/blackboard/Bb72Tutorials.asp
Visit our website: http://www.twu.edu/blackboard,or call: (940) 898-3706
Monday, July 21, 2008
Tip #25: Adding audio, video, or Flash using the VTBE
Tip: You can add audio, video, or Flash to a Blackboard item using the Visual Text Box Editor (VTBE).
Here’s how to do it:
Navigate to a content area in your course (e.g. Course Documents) and click the Edit View link in the upper right-hand corner of the page. Click the + Item button to add a new item. Name the item and then click in the text box below. This is where you will add the audio, video, or Flash.
On the Visual Text Box Editor (VTBE), click the Add button for the component you would like to add (from left to right, those buttons are Add MPEG/AVI content, Add QuickTime content, Add Audio content, and Add Flash content):
Here’s how to do it:
Navigate to a content area in your course (e.g. Course Documents) and click the Edit View link in the upper right-hand corner of the page. Click the + Item button to add a new item. Name the item and then click in the text box below. This is where you will add the audio, video, or Flash.
On the Visual Text Box Editor (VTBE), click the Add button for the component you would like to add (from left to right, those buttons are Add MPEG/AVI content, Add QuickTime content, Add Audio content, and Add Flash content):

Click the Browse button to locate the file on your computer or external drive. Select the file options you would like and click the Submit button. On the preview page, click Submit again to add your content.
Caution regarding adding audio, video, or Flash files:
Be aware of the file size of the audio, video, or Flash file you add to your course. The larger the file size, the more difficulties students will experience in viewing that file and the Blackboard page on which the file is located. We recommend that any file uploaded to Blackboard is no larger than 5 MB.
Be aware of the file size of the audio, video, or Flash file you add to your course. The larger the file size, the more difficulties students will experience in viewing that file and the Blackboard page on which the file is located. We recommend that any file uploaded to Blackboard is no larger than 5 MB.
Want more information?
Step-by-step tutorials are available at:
http://www.twu.edu/blackboard/Bb72Tutorials.aspStep-by-step tutorials are available at:
Visit our website: http://www.twu.edu/blackboard,
or call: (940) 898-3706
Wednesday, July 9, 2008
Tip #24: Adding an image using the VTBE
Tip: Add an image to your course using the Visual Text Box Editor (VTBE).
Here’s how to do it:
Navigate to a content area in your course (e.g. Course Documents) and click the Edit View link in the upper right-hand corner of the page. Click the + Item button to add a new item. Name the item and then click in the text box below. This is where you will add the image.
On the Visual Text Box Editor (VTBE), click the Add Image button.
Here’s how to do it:
Navigate to a content area in your course (e.g. Course Documents) and click the Edit View link in the upper right-hand corner of the page. Click the + Item button to add a new item. Name the item and then click in the text box below. This is where you will add the image.
On the Visual Text Box Editor (VTBE), click the Add Image button.

Click the Browse button to locate the image file on your computer or external drive. Select any image options you would like and click the Submit button. Resize the image by clicking on the image and dragging the corners in or out, depending on whether you want to enlarge or shrink the image.
What to do if you do not see the VTBE:
Check to make sure that your VTBE is enabled. On your Blackboard welcome page (where your courses are listed), click the Personal Information link on the left-hand Tools menu. Click Set Visual Text Box Editor Options and make sure that the VTBE is enabled. Click Submit. You will need to log out and log back in to Blackboard to see your changes.
The VTBE for Safari users does not have the Add Image button. Macintosh users should use the Firefox browser to enable the full version of the VTBE.
Want more information?
Step-by-step tutorials are available at:
http://www.twu.edu/blackboard/Bb72Tutorials.aspStep-by-step tutorials are available at:
Visit our website: http://www.twu.edu/blackboard,
or call: (940) 898-3706
Tuesday, July 8, 2008
Tip #23: Creating an anonymous survey
Tip: You can create an anonymous survey in Blackboard.
Here’s how to do it:
Navigate to the Control Panel of your course and click Survey Manager. Click the + Add Survey button. Type a name for the survey and type any description or instructions you want to provide. Click Submit.
Add questions to the survey by clicking the drop-down menu next to the words Add Calculated Formula. Select the type of question you would like to add and click the Go button. For open-ended questions, select the Short Answer or Essay question types. Continue adding questions until you have completed your survey.
To launch the survey in your course, navigate to the course area to which you would like to add the survey. Click the Edit View link at the upper right corner of the page. Click the drop-down menu next to the words + Select: Learning Unit and select the Survey option. Click the Go button. Select the survey you created and click Submit. To change the survey availability and settings, click the Modify the Survey options link on the following page.
Survey anonymity in Blackboard:
Surveys in Blackboard are anonymous, so you will not be able to discern individuals’ survey answers. To view the full survey results, navigate to your course Gradebook. Locate the survey Gradebook item and click name of the survey. Click the Download Results link and select your download options. NOTE: Microsoft Excel will open a .csv file or a tab-delimited file.
Want more information?
Step-by-step tutorials are available at: http://www.twu.edu/blackboard/Bb72Tutorials.asp
Visit our website: http://www.twu.edu/blackboard,
or call: (940) 898-3706
Here’s how to do it:
Navigate to the Control Panel of your course and click Survey Manager. Click the + Add Survey button. Type a name for the survey and type any description or instructions you want to provide. Click Submit.
Add questions to the survey by clicking the drop-down menu next to the words Add Calculated Formula. Select the type of question you would like to add and click the Go button. For open-ended questions, select the Short Answer or Essay question types. Continue adding questions until you have completed your survey.
To launch the survey in your course, navigate to the course area to which you would like to add the survey. Click the Edit View link at the upper right corner of the page. Click the drop-down menu next to the words + Select: Learning Unit and select the Survey option. Click the Go button. Select the survey you created and click Submit. To change the survey availability and settings, click the Modify the Survey options link on the following page.
Survey anonymity in Blackboard:
Surveys in Blackboard are anonymous, so you will not be able to discern individuals’ survey answers. To view the full survey results, navigate to your course Gradebook. Locate the survey Gradebook item and click name of the survey. Click the Download Results link and select your download options. NOTE: Microsoft Excel will open a .csv file or a tab-delimited file.
Want more information?
Step-by-step tutorials are available at: http://www.twu.edu/blackboard/Bb72Tutorials.asp
Visit our website: http://www.twu.edu/blackboard,
or call: (940) 898-3706
Subscribe to:
Posts (Atom)


 Posts
Posts

