
Application: Word, Excel, PowerPoint 2007 & 2010
Microsoft documents contain properties that can include the document title, author name, subject, and keyword tags. Using keyword tags can make searching for documents quicker and easier. When sharing documents with others, it is important to restrict editing if you do not want document properties changed.
Office 2007 document properties
1. In Word, Excel, or PowerPoint, click the Microsoft Office button.
2. Scroll to Prepare and then click Properties.
3. The Document Information Panel will appear. Update any fields listed.
Optional: Click the down arrow by Document Properties to view or update Advanced Properties.
Office 2010 document properties
1. In Word, Excel, or PowerPoint, click the File tab.
2. Click Info to view the document properties.
3. To update fields, click the field.
Optional: To see advanced properties, click Show All Properties.
Want to know more about document properties? Microsoft has more information for Office 2007 and Office 2010 users. When sharing documents with others, use the document inspector feature to reveal and remove hidden information. The Microsoft website features application specific articles about the document inspector feature.
For faculty, an interesting article from the Chronicle of Higher Education on Keeping Blind Review Blind by Anonymizing Documents.
Showing posts with label Office 2007. Show all posts
Showing posts with label Office 2007. Show all posts
Monday, May 9, 2011


Monday, April 25, 2011
Dividing Text in Excel
Application: Microsoft Excel 2007 & 2010
Have you ever needed to separate last name and first names in an excel spreadsheet? There are frequently times when spreadsheet data needs to be divided into more granular information in order to better sort, filter, alphabetize, or use in a mail merge independently.
Spreadsheets can be updated with Excel’s Text to Column command that can divide the data into separate columns.
Divide data in one column
*These steps apply to data where a space is used to divide. For data that is divided by commas or other, please see the article listed below.
1. Insert a column(s) where the divided data will be placed.
2. On the Data ribbon, select Text to Columns.
3. The Text to Columns Wizard will appear. In Step 1, select Delimited.
4. Click Next. In Step 2, select Space. Be sure to uncheck all other options.
5. Click Next. In Step 3, select Text.
6. Click Finish.


Have you ever needed to separate last name and first names in an excel spreadsheet? There are frequently times when spreadsheet data needs to be divided into more granular information in order to better sort, filter, alphabetize, or use in a mail merge independently.
Spreadsheets can be updated with Excel’s Text to Column command that can divide the data into separate columns.
Divide data in one column
*These steps apply to data where a space is used to divide. For data that is divided by commas or other, please see the article listed below.
1. Insert a column(s) where the divided data will be placed.
2. On the Data ribbon, select Text to Columns.
3. The Text to Columns Wizard will appear. In Step 1, select Delimited.
4. Click Next. In Step 2, select Space. Be sure to uncheck all other options.
5. Click Next. In Step 3, select Text.
6. Click Finish.
becomes
Monday, March 28, 2011
Tip of the Week: Adding to My Links
Application: SharePoint
SharePoint has its own bookmarking option to allow for direct navigation to frequently used sites. Both SharePoint and other internet sites can be bookmarked. This list of links or bookmarks can be accessed anywhere through SharePoint.
How to add a link or bookmark in SharePoint
1. Go to Share.twu.edu. (From on campus)
2. Navigate to a specific page. For example, click on Instructional Support Services, then select Denton, then select Training.
3. In the upper right corner of the page, click on My Links.
4. Select Add to My Links.
5. A dialog box appears. Make any optional changes needed such as the name of the link, who can view the links, which group to add the link to or create a new group of links.
6. Click OK.
SharePoint has its own bookmarking option to allow for direct navigation to frequently used sites. Both SharePoint and other internet sites can be bookmarked. This list of links or bookmarks can be accessed anywhere through SharePoint.
How to add a link or bookmark in SharePoint
1. Go to Share.twu.edu. (From on campus)
2. Navigate to a specific page. For example, click on Instructional Support Services, then select Denton, then select Training.
3. In the upper right corner of the page, click on My Links.
4. Select Add to My Links.
5. A dialog box appears. Make any optional changes needed such as the name of the link, who can view the links, which group to add the link to or create a new group of links.
6. Click OK.
Monday, March 7, 2011
Tip of the Week: Managing Multiple Schedules
Applications: Outlook & SharePoint
Scheduling a meeting with multiple people or managing multiple schedules for various projects can be challenging. Offices use calendars to schedule meetings, vacations, phone coverage, appointments and more. To manage multiple schedules, there are several technology tools available.
Scheduling MeetingsMicrosoft Outlook calendars offer schedule availability options. Each faculty and staff member can designate times as busy, free, tentative, or out of the office. To schedule a meeting in Outlook:
1. Click on the calendar tab in the navigation pane
2. Select the date for the meeting
3. Right-click to open the dialog box and choose an option such as New Appointment, New All Day Event, New Meeting Request, etc.
4. A new dialog box will open. Select options for title, location, length of meeting, reminders, importance, etc.
When inviting others to a meeting with a meeting request, they are given the option to accept, decline, or mark tentative. The meeting request then keeps track of who has responded and how.
Office Calendars
When working with a group of people, SharePoint calendars can be used. The flexibility of SharePoint allows multiple calendars to be built in any site. A different calendar can be used for each project or person. SharePoint calendars can be connected to Outlook for ease of adding and modifying events. SharePoint also has options to determine levels of access to view, edit, or delete events.
Scheduling a meeting with multiple people or managing multiple schedules for various projects can be challenging. Offices use calendars to schedule meetings, vacations, phone coverage, appointments and more. To manage multiple schedules, there are several technology tools available.
Scheduling MeetingsMicrosoft Outlook calendars offer schedule availability options. Each faculty and staff member can designate times as busy, free, tentative, or out of the office. To schedule a meeting in Outlook:
1. Click on the calendar tab in the navigation pane
2. Select the date for the meeting
3. Right-click to open the dialog box and choose an option such as New Appointment, New All Day Event, New Meeting Request, etc.
4. A new dialog box will open. Select options for title, location, length of meeting, reminders, importance, etc.
When inviting others to a meeting with a meeting request, they are given the option to accept, decline, or mark tentative. The meeting request then keeps track of who has responded and how.
Office Calendars
When working with a group of people, SharePoint calendars can be used. The flexibility of SharePoint allows multiple calendars to be built in any site. A different calendar can be used for each project or person. SharePoint calendars can be connected to Outlook for ease of adding and modifying events. SharePoint also has options to determine levels of access to view, edit, or delete events.
Monday, February 21, 2011
Tip of the Week: Using My Site in SharePoint
Application: SharePoint
Each TWU faculty and staff has a My Site space in SharePoint. This is an internal website that can be used to store documents, keep a calendar, project tasks and more. SharePoint is available from on or off campus, making it a flexible way to store and manage information. There are two parts of My Site: My Home and My Profile.
Using My Home in SharePoint
• Personal place to store documents, calendars, surveys, tasks, and lists
• Permissions can be set by item to determine who can view or edit
• Many items can be linked to your Outlook account to view and edit through Outlook
Using My Profile in SharePoint
• Professional public profile page
• Fields to offer information about professional affiliations, skills, contact info, reporting hierarchy
• Option to display a picture
Each TWU faculty and staff has a My Site space in SharePoint. This is an internal website that can be used to store documents, keep a calendar, project tasks and more. SharePoint is available from on or off campus, making it a flexible way to store and manage information. There are two parts of My Site: My Home and My Profile.
Using My Home in SharePoint
• Personal place to store documents, calendars, surveys, tasks, and lists
• Permissions can be set by item to determine who can view or edit
• Many items can be linked to your Outlook account to view and edit through Outlook
Using My Profile in SharePoint
• Professional public profile page
• Fields to offer information about professional affiliations, skills, contact info, reporting hierarchy
• Option to display a picture
Monday, February 14, 2011
Tip of the Week: Public Folders
Applications: Microsoft Outlook
Public folders are special Outlook accounts that allow a group of people to share email. Public folders can have subfolders as well, for various departmental or project needs.
How are TWU offices using Public Folders?
Departmental email point of contact
Many TWU departments have email enabled public folders so that their department has a generic department point of contact, such as departmentname@twu.edu. These account names can be used in department literature so that several departmental people can process incoming requests.
Departmental central voicemail & fax
Many TWU departments use a public folder for their main line voicemail messages as well as faxes. This can be a time and cost savings to the department.
Public folders are special Outlook accounts that allow a group of people to share email. Public folders can have subfolders as well, for various departmental or project needs.
How are TWU offices using Public Folders?
Departmental email point of contact
Many TWU departments have email enabled public folders so that their department has a generic department point of contact, such as departmentname@twu.edu. These account names can be used in department literature so that several departmental people can process incoming requests.
Departmental central voicemail & fax
Many TWU departments use a public folder for their main line voicemail messages as well as faxes. This can be a time and cost savings to the department.
Monday, January 24, 2011
Tip of the Week: Document Location Command
Application: Microsoft Office 2007 Word, Excel, PowerPoint; Microsoft Office 2010 Word, Excel, PowerPoint
When working with Office files, it is important to know the location of the saved document. Files can be saved on a local computer, a storage device, a shared drive, or SharePoint. Microsoft Office has a Document Location command that can be added to the Quick Access Toolbar so that the save location is always visible.
How to add the Document Location command in Office 2007
1. In Word, Excel, or PowerPoint, go to the Office button.
2. Click on Word Options, Excel Options or PowerPoint Options.
3. Select Customize.
4. In the drop down box Choose Commands from, select All Commands.
5. Scroll down to find Document Location, then click Add.
6. Click OK.
How to add the Document Location command in Office 2010
1. In Word, Excel, or PowerPoint go to the File tab.
2. Go to Options.
3. Select Quick Access Toolbar.
4. In the drop down box Choose Commands from, select All Commands.
5. Scroll down to find Document Location, then click Add.
6. Click OK.
When working with Office files, it is important to know the location of the saved document. Files can be saved on a local computer, a storage device, a shared drive, or SharePoint. Microsoft Office has a Document Location command that can be added to the Quick Access Toolbar so that the save location is always visible.
How to add the Document Location command in Office 2007
1. In Word, Excel, or PowerPoint, go to the Office button.
2. Click on Word Options, Excel Options or PowerPoint Options.
3. Select Customize.
4. In the drop down box Choose Commands from, select All Commands.
5. Scroll down to find Document Location, then click Add.
6. Click OK.
How to add the Document Location command in Office 2010
1. In Word, Excel, or PowerPoint go to the File tab.
2. Go to Options.
3. Select Quick Access Toolbar.
4. In the drop down box Choose Commands from, select All Commands.
5. Scroll down to find Document Location, then click Add.
6. Click OK.
Monday, September 13, 2010
Tip of the Week: Managing Multiple Schedules
Applications: Outlook Web 2.0 Tools: Tungle & Doodle
Scheduling a meeting with multiple people can be challenging. Finding a time that works for everyone is the first step. To manage multiple schedules, there are several technology tools available.
Within the TWU Community
Microsoft Outlook calendars offer schedule availability options. Each faculty and staff member can designate times as busy, free, tentative, or out of the office.
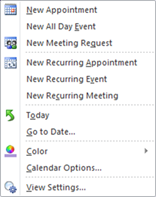 To schedule a meeting in Outlook:
Outside the TWU Community
When working with a group of people from outside the campus, there are Web 2.0 tools available to use in scheduling. Tungle and Doodle are web based applications that have free account options.
Tungle synchronizes several calendars of different types including Google apps and Microsoft Office Outlook. Tungle can be accessed using accounts you may already have including Facebook, Twitter, and LinkedIn. Tungle also offers an app for smartphone users.
Doodle synchronizes calendars of different types including Google, Microsoft Office Outlook, ICal, Yahoo, and Live. Registration is optional. Doodle also offers an app for smartphone users.
Thank you to Matt Moustakas, Director of Environmental, Safety & Health, Facilities Management & Construction for sharing these tools!
Scheduling a meeting with multiple people can be challenging. Finding a time that works for everyone is the first step. To manage multiple schedules, there are several technology tools available.
Within the TWU Community
Microsoft Outlook calendars offer schedule availability options. Each faculty and staff member can designate times as busy, free, tentative, or out of the office.
To schedule a meeting in Outlook:- Click on the calendar tab in the navigation pane
- Select the date for the meeting
- Right-click to open the dialog box and choose an option such as New Appointment, New All Day Event, New Meeting Request, etc.
- A new dialog box will open. Select options for title, location, length of meeting, reminders, importance, etc.
Outside the TWU Community
When working with a group of people from outside the campus, there are Web 2.0 tools available to use in scheduling. Tungle and Doodle are web based applications that have free account options.
Tungle synchronizes several calendars of different types including Google apps and Microsoft Office Outlook. Tungle can be accessed using accounts you may already have including Facebook, Twitter, and LinkedIn. Tungle also offers an app for smartphone users.
Doodle synchronizes calendars of different types including Google, Microsoft Office Outlook, ICal, Yahoo, and Live. Registration is optional. Doodle also offers an app for smartphone users.
Thank you to Matt Moustakas, Director of Environmental, Safety & Health, Facilities Management & Construction for sharing these tools!
Monday, August 30, 2010
Voicemail Tip of the Week: Phone Commands
Voicemail
Voicemail offers the option to set an Out of Office greeting and status that can be set to give callers information about your absence. Check for procedures within your department for specific items to be included in your greeting such as information about dates of absence and return, regular office hours, and when they can expect a return phone call. Your department may also ask you to offer website information if that is an acceptable means of information for callers. It is recommended that each person updates their greeting, and offices should be sure the main departmental line is updated when hours are changed. Upon return to work, be sure to switch back to the regular greeting and status. Step-by-step instructions for Out of Office messages
Phone Forwarding
As a courtesy to callers, be sure to forward each voicemail enabled phone immediately to voicemail. This quickly gives information to callers. Upon return work, be sure to clear immediate forwarding and reset as appropriate for your office. Step-by-step instructions for Phone Forwarding.
Outlook Email
Microsoft Office Outlook’s Out of Office Assistant can be used to automatically respond to email messages in the event of an absence. The Out of Office Assistant can respond differently to emails within and outside of TWU. Check for specific procedures within your department for specific items to be included in your Out of Office replies such as dates of absence and return, an alternative point of contact, and when to expect a response. Your department may also ask you to offer website information if that is an acceptable means of information for inquiries. Upon return to work, be sure to remove the automatic response. Step-by-step instructions on using Outlook's Out of Office Assistant.
Note: Visit our blogpost to find out how to Set Out of Office using Outlook Web Access.
NOTE: Remember to remove the out of office status on your e-mail & voicemail. Removing out of office must be done on both voicemail and e-mail.
Voicemail is available for all permanent faculty and staff. To setup an account e-mail voicemail@twu.edu from your TWU e-mail account and include name, campus and telephone extension.
Want more information? Call the TWU Helpdesk (940) 898-3971
Voicemail offers the option to set an Out of Office greeting and status that can be set to give callers information about your absence. Check for procedures within your department for specific items to be included in your greeting such as information about dates of absence and return, regular office hours, and when they can expect a return phone call. Your department may also ask you to offer website information if that is an acceptable means of information for callers. It is recommended that each person updates their greeting, and offices should be sure the main departmental line is updated when hours are changed. Upon return to work, be sure to switch back to the regular greeting and status. Step-by-step instructions for Out of Office messages
Phone Forwarding
As a courtesy to callers, be sure to forward each voicemail enabled phone immediately to voicemail. This quickly gives information to callers. Upon return work, be sure to clear immediate forwarding and reset as appropriate for your office. Step-by-step instructions for Phone Forwarding.
Outlook Email
Microsoft Office Outlook’s Out of Office Assistant can be used to automatically respond to email messages in the event of an absence. The Out of Office Assistant can respond differently to emails within and outside of TWU. Check for specific procedures within your department for specific items to be included in your Out of Office replies such as dates of absence and return, an alternative point of contact, and when to expect a response. Your department may also ask you to offer website information if that is an acceptable means of information for inquiries. Upon return to work, be sure to remove the automatic response. Step-by-step instructions on using Outlook's Out of Office Assistant.
Note: Visit our blogpost to find out how to Set Out of Office using Outlook Web Access.
NOTE: Remember to remove the out of office status on your e-mail & voicemail. Removing out of office must be done on both voicemail and e-mail.
Voicemail is available for all permanent faculty and staff. To setup an account e-mail voicemail@twu.edu from your TWU e-mail account and include name, campus and telephone extension.
Want more information? Call the TWU Helpdesk (940) 898-3971
Tuesday, March 23, 2010
Microsoft Office Tip of the Week: Recent Document List
Applications: Word, Excel, PowerPoint
Many Microsoft Office programs display the last few files opened in that program. The list of recently documents can be customized to adjust the number of files or specific files that it displays.
Change the number of files that appear in the list of recent documents
To keep documents on the Recent Documents List:
Note: When a document is pinned to the Recent Documents list, the pin button looks like a push pin viewed from the top: .
.
To undo this feature, push the again, and it will appear as  .
.
Many Microsoft Office programs display the last few files opened in that program. The list of recently documents can be customized to adjust the number of files or specific files that it displays.
Change the number of files that appear in the list of recent documents
- Click the Microsoft Office Button
 , and then click (Excel, PowerPoint, or Word) Options.
 - Click Advanced.
- Under Display, in the Show this number of Recent Documents list, click the number of files that you want to display.
To keep documents on the Recent Documents List:
- Click the Microsoft Office Button .
- Click Pin this document to the Recent Documents list .
Note: When a document is pinned to the Recent Documents list, the pin button looks like a push pin viewed from the top:
.To undo this feature, push the
again, and it will appear as .
Monday, November 23, 2009
Microsoft Office Tip: Set Out of Office using Outlook Web Access
- Click Options
- On the left-hand navigation, select Out of Office Assistant
- Select Send Out of Office auto-replies
- To limit the dates of auto-replies, select the option Send Out of Office auto-replies only during this time period and set the appropriate dates
- NOTE: If this option is not selected, auto-replies will be sent until Do not send Out of Office auto-replies is manually selected
- In the topmost text box, labeled Send an auto-reply once to each sender inside my organization with the following message, enter the response you would like sent to emails from within the TWU system
- Just below that text box, make sure the Send Out of Office auto-relies to External Senders box is checked
- Select whether you want auto-replies sent only to senders in my Contacts list or to anyone outside my organization
- In the final text box, labeled Send an auto-reply once to each sender outside my organization with the following message, enter the response you would like sent to emails that are not within the TWU system
- Click on the Save button located near the top of the page
Microsoft Office Tip of the Week: Out of Office Assistant
Application: Outlook 2007
Microsoft Office Outlook’s Out of Office Assistant can be used to automatically respond to email messages in the event of an absence. The Out of Office Assistant can respond to emails both within and outside of TWU. Out of Office replies can be used to give dates of an absence, an alternative point of contact, and a means of communication to those emailing.
Here’s how to do it:
- In Outlook, go to the Tools menu and select Out of Office Assistant
- Select Send Out of Office auto-replies
- To limit the dates of auto-replies, select the option Only send during this time range and set the appropriate dates
- NOTE: If this option is not selected, auto-replies will be sent until Do not send Out of Office auto-replies is manually selected
- Compose a response for Inside My Organization (within TWU) and enter the information
- Click on the Outside My Organization tab and make sure the Auto-reply to people outside my organization box is checked
- Select whether you want auto-replies sent only to My Contacts only or Anyone outside my organization
- Compose a response for Outside My Organization (those outside TWU) and enter the information
- Click on OK
Monday, November 2, 2009
Microsoft Office Tip of the Week: Track Changes
Applications: Word 2007
Track Changes is a Microsoft Office feature that is useful when collaborating with coworkers on documents. Track changes can show deletions, comments, formatting changes, and content that has moved.
Turn change tracking on or off
- On the Review tab, in the Tracking group, click the Track Changes image. When change tracking is active, the icon will be orange. To turn off this function, click the Track Changes image again.
- To add a Track Changes Indicator to the status bar, right-click the status bar and click Track Changes. Click the Track Changes Indicator on the status bar to turn change tracking on or off.
Track changes while you edit
1. Open the document that you want to revise.
2. On the Review tab, in the Tracking group, click the Track Changes image.
3. Make the changes that you want by inserting, deleting, moving, or formatting text or graphics. You can also add comments.
After you are finished editing
After you’ve finished editing your document, use the Document Inspector to find and remove any hidden data stored by the Track Changes tool. To learn more about it, visit our past tip about the Document Inspector.
Monday, October 12, 2009
Microsoft Office Tip of the Week: Format Painter
Applications: Word, Excel, PowerPoint, Outlook
The Microsoft Format Painter copies the formatting of shapes, objects, or text in a document. This ability increases consistency in a document which may contain many different format styles. The Format Painter is available in Word, PowerPoint, Excel and Outlook.
Example:
Consistent formatting increases readability.
Isn’t this easier to read now?
To make the statements above match in style, use the Format Painter.
1. Highlight the text with the correct formatting.
2. On the Home tab, go to the Clipboard group and select the Format Painter which is signified by a paint brush.
3. Select the text to be formatted.
Now, the statements match in formatting.
Consistent formatting increases readability.
Isn’t this easier to read now?
For specific information about using the Format Painter in Microsoft Office Programs, check out:
Word:
http://office.microsoft.com/en-us/help/HA100905271033.aspx
Excel, PowerPoint, and Outlook:
http://office.microsoft.com/en-us/help/HA102103271033.aspx
The Microsoft Format Painter copies the formatting of shapes, objects, or text in a document. This ability increases consistency in a document which may contain many different format styles. The Format Painter is available in Word, PowerPoint, Excel and Outlook.
Example:
Consistent formatting increases readability.
Isn’t this easier to read now?
To make the statements above match in style, use the Format Painter.
1. Highlight the text with the correct formatting.
2. On the Home tab, go to the Clipboard group and select the Format Painter which is signified by a paint brush.
3. Select the text to be formatted.
Now, the statements match in formatting.
Consistent formatting increases readability.
Isn’t this easier to read now?
For specific information about using the Format Painter in Microsoft Office Programs, check out:
Word:
http://office.microsoft.com/en-us/help/HA100905271033.aspx
Excel, PowerPoint, and Outlook:
http://office.microsoft.com/en-us/help/HA102103271033.aspx
Monday, September 21, 2009
Microsoft Office Tip of the Week: Document Inspector
Applications: Word, Excel, PowerPoint
Microsoft Office documents often contain data that should be removed before sharing. Word may have editing changes that appear when shared. Excel spreadsheets may contain hidden rows or columns of data that should not be viewed by others. PowerPoint files may have graphics or text that do not appear on the slide, but are available when the file is opened. For final proofreading before sharing a document, use the Microsoft Office Document Inspector.
NOTE: Before running the Document Inspector, save a copy of the document under a different name. Some changes made by the Document Inspector cannot be undone.
To run the document inspector:
1. Open the renamed/copy version of the Office document to inspect.
2. Click the Microsoft Office Button, point to Prepare, and then click Inspect Document.
3. In the Document Inspector dialog box, select the check boxes to choose the types of hidden content that you want to be inspected.
4. Click Inspect.
5. Review the results of the inspection in the Document Inspector dialog box.
6. Click Remove All next to the inspection results for the types of hidden content that you want to remove from your document.
The following links provide more detail on aspects of the Document Inspector for individual programs:
Word:
http://office.microsoft.com/en-us/word/HA100744351033.aspx?pid=CH100996521033
Excel:
http://office.microsoft.com/en-us/excel/HA100744381033.aspx?pid=CH100648291033
PowerPoint:
http://office.microsoft.com/en-us/powerpoint/HA100744371033.aspx?pid=CH100673541033
Looking for more information?
Follow us on Twitter
Microsoft Office documents often contain data that should be removed before sharing. Word may have editing changes that appear when shared. Excel spreadsheets may contain hidden rows or columns of data that should not be viewed by others. PowerPoint files may have graphics or text that do not appear on the slide, but are available when the file is opened. For final proofreading before sharing a document, use the Microsoft Office Document Inspector.
NOTE: Before running the Document Inspector, save a copy of the document under a different name. Some changes made by the Document Inspector cannot be undone.
To run the document inspector:
1. Open the renamed/copy version of the Office document to inspect.
2. Click the Microsoft Office Button, point to Prepare, and then click Inspect Document.
3. In the Document Inspector dialog box, select the check boxes to choose the types of hidden content that you want to be inspected.
4. Click Inspect.
5. Review the results of the inspection in the Document Inspector dialog box.
6. Click Remove All next to the inspection results for the types of hidden content that you want to remove from your document.
The following links provide more detail on aspects of the Document Inspector for individual programs:
Word:
http://office.microsoft.com/en-us/word/HA100744351033.aspx?pid=CH100996521033
Excel:
http://office.microsoft.com/en-us/excel/HA100744381033.aspx?pid=CH100648291033
PowerPoint:
http://office.microsoft.com/en-us/powerpoint/HA100744371033.aspx?pid=CH100673541033
Looking for more information?
Follow us on Twitter
Monday, December 8, 2008
Tip #15: Word: Customizing Shortcut Keys
Shortcut keys allow you to quickly execute common commands without searching for the command on menus. Word has set shortcuts for several common tasks. Common preset shortcuts include CTRL-Z (undo), CTRL-S (Save), CTRL-C (copy), and CTRL-P (paste).
In Word 2007 you can change a default shortcut key to one that makes more sense to you. Or, you may want to add a shortcut key to a command that does not currently have one.
Setting a Customized Shortcut Key
1. Click the Office button
2. Select Word Options
3. Select Customize from the side menu
4. At the bottom of the window, next to Keyboard Shortcuts click Customize.
5. In the Customize Keyboard dialog box, locate the command for which you would like to edit the keyboard shortcut. Start by selecting the category. For each category, the commands will appear at the right side of the window. When you select one, a brief description will appear at the bottom of the dialog box.
6. The current shortcut key, if there is one, will appear in the Current Keys box
7. Click inside the box labeled Press new shortcut key
8. Press the shortcut key you would like to use. Include the Ctrl, Shift, or Ctrl + Shift keys.
9. If the shortcut key is currently assigned, Word will tell you what command currently uses the shortcut key. If this occurs, you may reassign the shortcut key, or select a different shortcut key sequence.
11. Under Save Changes In… select where the key is saved: Normal template affects ALL documents or only the current document
12. Click Assign to apply the changes
13. Click Close
NOTE: You can revert to the original shortcut presets by pressing Reset All on the Customize Keyboard dialog box.
Where can I find more information about Office 2007? The ISS Training site provides Quick Reference Guides and Courseware for Microsoft Office. https://portal.twu.edu/iss-training/appstraining/ms_applications.htm
For additional support, please contact the Help Desk, (940) 898-3971.
In Word 2007 you can change a default shortcut key to one that makes more sense to you. Or, you may want to add a shortcut key to a command that does not currently have one.
Setting a Customized Shortcut Key
1. Click the Office button
2. Select Word Options
3. Select Customize from the side menu
4. At the bottom of the window, next to Keyboard Shortcuts click Customize.
5. In the Customize Keyboard dialog box, locate the command for which you would like to edit the keyboard shortcut. Start by selecting the category. For each category, the commands will appear at the right side of the window. When you select one, a brief description will appear at the bottom of the dialog box.
6. The current shortcut key, if there is one, will appear in the Current Keys box
7. Click inside the box labeled Press new shortcut key
8. Press the shortcut key you would like to use. Include the Ctrl, Shift, or Ctrl + Shift keys.
9. If the shortcut key is currently assigned, Word will tell you what command currently uses the shortcut key. If this occurs, you may reassign the shortcut key, or select a different shortcut key sequence.
11. Under Save Changes In… select where the key is saved: Normal template affects ALL documents or only the current document
12. Click Assign to apply the changes
13. Click Close
NOTE: You can revert to the original shortcut presets by pressing Reset All on the Customize Keyboard dialog box.
Where can I find more information about Office 2007? The ISS Training site provides Quick Reference Guides and Courseware for Microsoft Office. https://portal.twu.edu/iss-training/appstraining/ms_applications.htm
For additional support, please contact the Help Desk, (940) 898-3971.
Monday, December 1, 2008
Tip #14: Outlook: Previewing Attachments
Previewing attachments is a new feature of Outlook 2007. When you receive an attachment in a message and want to see what the attachment contains without opening the file, you can preview the attachment. You can preview an attachment in the Reading Pane or from within an open message. To preview an attached file created in a 2007 Microsoft Office system application, you must have that application installed on your computer. For example, to preview a Word attachment, you must have Word installed.
How to do it:
To preview an attachment, click a single time on the attachment icon. The attachment will appear in the message frame.
To return to message view, click the Message icon
NOTE: To open an attachment for editing, or for printing formatting, double click on the attachment icon and the attachment will open in its original application.
Where can I find more information about Office 2007? The ISS Training site provides Quick Reference Guides and Courseware for Microsoft Office. https://portal.twu.edu/iss-training/appstraining/ms_applications.htm
For additional support, please contact the Help Desk, (940) 898-3971.
Where can I find information about Office 2007 training sessions?
The ISS Training Calendar lists upcoming training for Office 2007.
https://portal.twu.edu/iss-training/calendar/index.html
How to do it:
To preview an attachment, click a single time on the attachment icon. The attachment will appear in the message frame.
To return to message view, click the Message icon
NOTE: To open an attachment for editing, or for printing formatting, double click on the attachment icon and the attachment will open in its original application.
Where can I find more information about Office 2007? The ISS Training site provides Quick Reference Guides and Courseware for Microsoft Office. https://portal.twu.edu/iss-training/appstraining/ms_applications.htm
For additional support, please contact the Help Desk, (940) 898-3971.
Where can I find information about Office 2007 training sessions?
The ISS Training Calendar lists upcoming training for Office 2007.
https://portal.twu.edu/iss-training/calendar/index.html
Monday, November 17, 2008
Tip #13: Excel: Charts
Microsoft Office 2007 has removed the chart wizard feature. Charts are now created by a single click on the Office Ribbon’s Insert tab. This new charting feature allows easier customization. Once the chart is created you can modify it to display additional information and data.
Creating a Basic Chart
1. Arrange the data in rows and columns on a worksheet. Excel will determine the best way to plot the data. If you prefer a certain layout, look at the suggested data arrangements provided by Microsoft Office.
2. Select the cells that contain the data for the chart.
3. On the Insert tab, in the Charts group click the chart type, and then click the chart subtype.
NOTE: To see all available chart type, click one chart type, and then click All Chart Types.
4. The chart will be placed in the worksheet as an embedded chart.
Moving the chart to a separate sheet
To place the chart in a separate sheet so that it can be viewed by itself:
1. Click the chart to select it.
2. On the Design tab, in the location group, click Move Chart.
3. Choose where you want to place the chart.
Changing the chart layout or style
Pre-defined chart layouts and styles allow you to instantly change the look of a chart. Chart layouts allow you to change the information displayed and how the information is positioned on the chart. Chart styles allow you to change the chart color and design.
Applying a predefined chart layout
1. Click the chart.
2. On the Design tab, in the Charts Layout Group, click the chart layout you want to use.
Applying a predefined chart style:
1. Click the chart.
2. On the Design tab, in the Chart Styles Group, click the chart style you want to use.
Many more options are available for chart formatting and customization. See Microsoft Office’s Chart Creation for thorough directions on all charting options.
Where can I find more information about Office 2007? The ISS Training site provides Quick Reference Guides and Courseware for Microsoft Office. https://portal.twu.edu/iss-training/appstraining/ms_applications.htm
For additional support, please contact the Help Desk, (940) 898-3971.
Creating a Basic Chart
1. Arrange the data in rows and columns on a worksheet. Excel will determine the best way to plot the data. If you prefer a certain layout, look at the suggested data arrangements provided by Microsoft Office.
2. Select the cells that contain the data for the chart.
3. On the Insert tab, in the Charts group click the chart type, and then click the chart subtype.
NOTE: To see all available chart type, click one chart type, and then click All Chart Types.
4. The chart will be placed in the worksheet as an embedded chart.
Moving the chart to a separate sheet
To place the chart in a separate sheet so that it can be viewed by itself:
1. Click the chart to select it.
2. On the Design tab, in the location group, click Move Chart.
3. Choose where you want to place the chart.
Changing the chart layout or style
Pre-defined chart layouts and styles allow you to instantly change the look of a chart. Chart layouts allow you to change the information displayed and how the information is positioned on the chart. Chart styles allow you to change the chart color and design.
Applying a predefined chart layout
1. Click the chart.
2. On the Design tab, in the Charts Layout Group, click the chart layout you want to use.
Applying a predefined chart style:
1. Click the chart.
2. On the Design tab, in the Chart Styles Group, click the chart style you want to use.
Many more options are available for chart formatting and customization. See Microsoft Office’s Chart Creation for thorough directions on all charting options.
Where can I find more information about Office 2007? The ISS Training site provides Quick Reference Guides and Courseware for Microsoft Office. https://portal.twu.edu/iss-training/appstraining/ms_applications.htm
For additional support, please contact the Help Desk, (940) 898-3971.
Monday, November 10, 2008
Tip #12: Word: Quick Styles
As in previous versions of Office, users are able to apply formatting to words or a block of text using the styles feature. Office 2007 introduced Quick Styles, a faster way to add and change styles.
Applying a Quick Style to text
1. Select the text to which you want to apply a style. To apply a style to an entire paragraph, place the cursor in the paragraph.
2. On the Home tab, in the Styles group, click the style that you want. If you don't see the style that you want, click the More button to expand the Quick Styles gallery.
Applying a Quick Style to text
1. Select the text to which you want to apply a style. To apply a style to an entire paragraph, place the cursor in the paragraph.
2. On the Home tab, in the Styles group, click the style that you want. If you don't see the style that you want, click the More button to expand the Quick Styles gallery.
Note: You can see how selected text will look with a particular style by placing your pointer over the style that you want to preview.
Note: If the style that you want does not appear in the Quick Styles gallery, press CTRL+SHIFT+S to open the Apply Styles task pane. Under Style Name, use the drop down menu to find the style you want to apply.
Add a new style to the Quick Styles gallery
To add a customized style to the Quick Styles gallery:
1. Format the text to reflect the formatting needed.
2. Select the text.
3. On the Home Tab, in the Styles Category click the More button.
4. Select Save Selection as a New Style.
5. Give the style a name and click OK.
The style that you created appears in the Quick Styles gallery with the name that you gave it.
When you want to use that formatting, select the text and click on the quick style box.
For more information about using Quick Styles, see the Microsoft Office Quick Styles Tip Sheets.
Where can I find more information about Office 2007? The ISS Training site provides Quick Reference Guides and Courseware for Microsoft Office. https://portal.twu.edu/iss-training/appstraining/ms_applications.htm
For additional support, please contact the Help Desk, (940) 898-3971.
Monday, November 3, 2008
Tip #11: Word: Changing Default Formatting
Do you miss the single space after pressing enter in Word 2007? By changing a few settings you can adjust the default spacing for newly created Word documents.
The Normal Template is what you see when creating a new document- the blank document with spacing, font, etc. By changing the normal template, you change preset formatting features for any new document that is created.
Changing Spacing Defaults
To change default spacing, begin by closing any open Word documents. Open a new word document. On the Home tab, navigate to the Paragraph group. Click the Line Spacing icon . Select Line Spacing Options. To eliminate extra spaces inserted before or after pressing enter settings should be set as follows:
Adjust line spacing to fit your preference (Single, 1.5 lines, Double, etc.)
Once settings are adjusted, click Default. Select Yes on the confirmation window.
Changing Font Defaults
To change font defaults, begin by closing any open Word documents. Open a new word document. On the Home tab, navigate to the Font group. Click the open dialog box icon . Select the font, font size, and other features preferred for the default setting.
Once settings are adjusted, click Default. Select Yes on the confirmation window.
Where can I find more information about Office 2007? The ISS Training site provides Quick Reference Guides and Courseware for Microsoft Office. https://portal.twu.edu/iss-training/appstraining/ms_applications.htm
For additional support, please contact the Help Desk, (940) 898-3971.
The Normal Template is what you see when creating a new document- the blank document with spacing, font, etc. By changing the normal template, you change preset formatting features for any new document that is created.
Changing Spacing Defaults
To change default spacing, begin by closing any open Word documents. Open a new word document. On the Home tab, navigate to the Paragraph group. Click the Line Spacing icon . Select Line Spacing Options. To eliminate extra spaces inserted before or after pressing enter settings should be set as follows:
Adjust line spacing to fit your preference (Single, 1.5 lines, Double, etc.)
Once settings are adjusted, click Default. Select Yes on the confirmation window.
Changing Font Defaults
To change font defaults, begin by closing any open Word documents. Open a new word document. On the Home tab, navigate to the Font group. Click the open dialog box icon . Select the font, font size, and other features preferred for the default setting.
Once settings are adjusted, click Default. Select Yes on the confirmation window.
Where can I find more information about Office 2007? The ISS Training site provides Quick Reference Guides and Courseware for Microsoft Office. https://portal.twu.edu/iss-training/appstraining/ms_applications.htm
For additional support, please contact the Help Desk, (940) 898-3971.
Subscribe to:
Posts (Atom)


 Posts
Posts

