
Tip: End of Semester Checklist
End-of-semester checklist:
1. Export the final course gradebook.
2. Archive your Blackboard course.
3. Make the course unavailable.
Exporting the Blackboard Gradebook
1) Access the course that contains the Gradebook you want to export
2) Click the Control Panel link
3) Click Gradebook
4) Click the Download Grades button
5) Select Comma or Tab as the Delimiter Type (both file types can be opened in MS Excel)
6) Click the Submit button and then click the Download button
7) Save the file to your Desktop (or anywhere on your computer that is appropriate)
8) Click OK
Archiving a Blackboard Course
1) Access the course you want to archive
2) Click the Control Panel link
3) Under the Course Options category, click Archive Course
4) Click the Archive button
5) Click Submit
6) After you receive the archive completion email, navigate to the Archive Course page again. Right-click the zipped course file and click Save Target As… to save the file to your computer
7) Click OK
Making a Course Unavailable
1) Access the course you want to make unavailable
2) Click the Control Panel link
3) Under the Course Options category, click Settings
4) Click Course Availability
5) Select No
6) Click Submit
Thursday, December 11, 2008
Monday, December 8, 2008
Tip #15: Word: Customizing Shortcut Keys
Shortcut keys allow you to quickly execute common commands without searching for the command on menus. Word has set shortcuts for several common tasks. Common preset shortcuts include CTRL-Z (undo), CTRL-S (Save), CTRL-C (copy), and CTRL-P (paste).
In Word 2007 you can change a default shortcut key to one that makes more sense to you. Or, you may want to add a shortcut key to a command that does not currently have one.
Setting a Customized Shortcut Key
1. Click the Office button
2. Select Word Options
3. Select Customize from the side menu
4. At the bottom of the window, next to Keyboard Shortcuts click Customize.
5. In the Customize Keyboard dialog box, locate the command for which you would like to edit the keyboard shortcut. Start by selecting the category. For each category, the commands will appear at the right side of the window. When you select one, a brief description will appear at the bottom of the dialog box.
6. The current shortcut key, if there is one, will appear in the Current Keys box
7. Click inside the box labeled Press new shortcut key
8. Press the shortcut key you would like to use. Include the Ctrl, Shift, or Ctrl + Shift keys.
9. If the shortcut key is currently assigned, Word will tell you what command currently uses the shortcut key. If this occurs, you may reassign the shortcut key, or select a different shortcut key sequence.
11. Under Save Changes In… select where the key is saved: Normal template affects ALL documents or only the current document
12. Click Assign to apply the changes
13. Click Close
NOTE: You can revert to the original shortcut presets by pressing Reset All on the Customize Keyboard dialog box.
Where can I find more information about Office 2007? The ISS Training site provides Quick Reference Guides and Courseware for Microsoft Office. https://portal.twu.edu/iss-training/appstraining/ms_applications.htm
For additional support, please contact the Help Desk, (940) 898-3971.
Wednesday, December 3, 2008
Tip #44: Weight Gradebook items by category or by item
Tip: You can weight Gradebook items by category or by item.
Here’s how to do it:
Navigate to your course Control Panel and click Gradebook. Click the Weight Grades button. Select the option to Weight by Category or to Weight by Item. Assign weight percentages to the desired categories or items. The percentages must add up to 100%. Click Submit to save the weights.
NOTE: After you assign weight to Gradebook items or categories, you cannot remove the weighting option from the Gradebook. Add weighting to the Gradebook only if you are certain that you will continue to use weighting the entire semester.
Weighting by Category:
Weighting by category allows you to assign a weight percentage to a particular type of Gradebook item, rather than to each Gradebook item. For example, you can weight all course quizzes at 30% of the students’ total grades. Each time you add a quiz, the weight percentage for each quiz will adjust accordingly.
To use this feature correctly, it is important that you assign Gradebook items to appropriate categories. You can change a Gradebook item’s category by clicking the Manage Items button in the Gradebook and clicking the Modify button next to the Gradebook item you want to change. Select a new category for the item and click Submit.
Monday, December 1, 2008
Tip #14: Outlook: Previewing Attachments
Previewing attachments is a new feature of Outlook 2007. When you receive an attachment in a message and want to see what the attachment contains without opening the file, you can preview the attachment. You can preview an attachment in the Reading Pane or from within an open message. To preview an attached file created in a 2007 Microsoft Office system application, you must have that application installed on your computer. For example, to preview a Word attachment, you must have Word installed.
How to do it:
To preview an attachment, click a single time on the attachment icon. The attachment will appear in the message frame.
To return to message view, click the Message icon
NOTE: To open an attachment for editing, or for printing formatting, double click on the attachment icon and the attachment will open in its original application.
Where can I find more information about Office 2007? The ISS Training site provides Quick Reference Guides and Courseware for Microsoft Office. https://portal.twu.edu/iss-training/appstraining/ms_applications.htm
For additional support, please contact the Help Desk, (940) 898-3971.
Where can I find information about Office 2007 training sessions?
The ISS Training Calendar lists upcoming training for Office 2007.
https://portal.twu.edu/iss-training/calendar/index.html
Monday, November 24, 2008
Tip #43: 2009 Blackboard Exemplary Course Program
Tip: Announcing the 2009 Blackboard Exemplary Course Program
The Blackboard Exemplary Course Program aims to help faculty use e-Learning technology more effectively by identifying and disseminating best practices for designing engaging online courses.
Using a rubric, instructors and course designers are able to evaluate how well their own course conforms to best practices for Course Design, Interaction & Collaboration, Assessment and Learner Support.
Consider participating in the 2009 Exemplary Course Program by submitting a course of your own or volunteering to be a reviewer or both!
There are many benefits to participating in the Exemplary Course Program:
- Learn course design best practices to improve the engagement, collaboration, assessment and learner support within your own courses
- Develop a fresh perspective by seeing how other instructors and designers from your discipline or area of interest are developing their courses
- Apply lessons learned from the Exemplary Course Rubric to your own courses or those you are helping to develop
- Receive detailed feedback on your own course development on the best practices you are employing or areas in which it can be improved
- Gain professional development experience and recognition for your accomplishments and participation in the program
This is a valuable learning experience for even the most seasoned instructor or designer.
To learn more about the 2009 Exemplary Course Program visit http://www.blackboard.com/ecp where you will find information on how to: - Volunteer to be a reviewer
- Download the Exemplary Course Rubric and explore best practices
- Learn about how to participate in the 2009 Exemplary Course Program
We encourage you to consider participating in the Exemplary Course Program. If you have questions please send an email to: ecp@blackboard.com
Wednesday, November 19, 2008
Tip #42: Test Generator
Tip: You can upload tests from Word to Blackboard using a test generator.
A test generator created by BYU-Idaho allows instructors to type their test in Word and then upload into Blackboard. Tests must be formatted for the generator to work correctly. This program is designed for simple test designs including essay, multiple answer, multiple choice and true/false questions. Question options can be modified once the test is imported into Blackboard.
Here’s how to do it:
1. Type in your test and format it in Word:
Number your test questions. Do not put number/letters next to the responses.
Skip one line between test questions.
Place an asterisk (*) in front of the correct answer.
Multiple choice questions: Type your question, and on the very next line start your answers. Put an asterisk(*) directly in front of any correct answers.
Example:
1. Which one of these is not another name for sugar?
sucrose
*sodium
glucose
maple syrup
Multiple answer questions: Type in your question, press Enter, on the very next line enter your answers. Put an * directly in front of any correct answers.
Example:
1. Whole grains are an important part of a healthy diet. The three parts of a grain kernel are:
Exoskeleton
*Bran
*Germ
*endosperm
Essay questions: Type your question and give no answer. Move on to the next question number.
Example:
1. What should you consider when selecting food from the fruit group?
True/False questions: Type your question, and on the very next line type True. On the next line type False (T and F won’t work). Put an *asterisk directly in front of the correct answer.
Example:
1. The meat and beans food group includes only beef and lima beans
True
*False
2. Convert the test using the test generator:
Copy the test from the Word document. Open the test generator located at: http://www.byui.edu/insttech/bbtest.asp and paste (CTRL-V) your test into the text box. Click Save as text file. Note the location of the saved file.
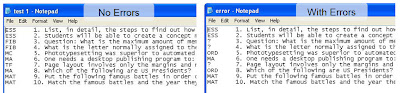
Open the saved file. This will open the file in Notepad and you can perform a quick check to see if there are any obvious errors. If there are no errors, it will look similar to the first example. If there are errors, it will have question marks in the left column as seen in the second example. Go back and check the formatting in Word. If the correct number of questions is not listed, check that Enter was pressed between each question in Word.
3. Upload questions into a test.
From the Control Panel, select Test Manager. Click the Add Test Button. Name your test. Description and Instructions are optional at this point (they can be changed later). Scroll to the bottom and click Submit. Click the drop down menu next to Add Question and select Upload Questions. Click GO. Click Browse to find the file you saved from the test generator. Click Open. Set the number of points possible per question. Click Submit. A Question Upload Complete screen should appear. Click OK to proceed.
The questions will appear in the test.
NOTE: If an Error message appears, the Word document was not formatted correctly. Make changes and copy past it again into the Test Generator. Repeat the steps again from Section 2.
NOTE: Questions can also be added to a test pool by selecting Pool Manager and following the same steps for uploading questions.
A test generator created by BYU-Idaho allows instructors to type their test in Word and then upload into Blackboard. Tests must be formatted for the generator to work correctly. This program is designed for simple test designs including essay, multiple answer, multiple choice and true/false questions. Question options can be modified once the test is imported into Blackboard.
Here’s how to do it:
1. Type in your test and format it in Word:
Number your test questions. Do not put number/letters next to the responses.
Skip one line between test questions.
Place an asterisk (*) in front of the correct answer.
Multiple choice questions: Type your question, and on the very next line start your answers. Put an asterisk(*) directly in front of any correct answers.
Example:
1. Which one of these is not another name for sugar?
sucrose
*sodium
glucose
maple syrup
Multiple answer questions: Type in your question, press Enter, on the very next line enter your answers. Put an * directly in front of any correct answers.
Example:
1. Whole grains are an important part of a healthy diet. The three parts of a grain kernel are:
Exoskeleton
*Bran
*Germ
*endosperm
Essay questions: Type your question and give no answer. Move on to the next question number.
Example:
1. What should you consider when selecting food from the fruit group?
True/False questions: Type your question, and on the very next line type True. On the next line type False (T and F won’t work). Put an *asterisk directly in front of the correct answer.
Example:
1. The meat and beans food group includes only beef and lima beans
True
*False
2. Convert the test using the test generator:
Copy the test from the Word document. Open the test generator located at: http://www.byui.edu/insttech/bbtest.asp and paste (CTRL-V) your test into the text box. Click Save as text file. Note the location of the saved file.
Open the saved file. This will open the file in Notepad and you can perform a quick check to see if there are any obvious errors. If there are no errors, it will look similar to the first example. If there are errors, it will have question marks in the left column as seen in the second example. Go back and check the formatting in Word. If the correct number of questions is not listed, check that Enter was pressed between each question in Word.

3. Upload questions into a test.
From the Control Panel, select Test Manager. Click the Add Test Button. Name your test. Description and Instructions are optional at this point (they can be changed later). Scroll to the bottom and click Submit. Click the drop down menu next to Add Question and select Upload Questions. Click GO. Click Browse to find the file you saved from the test generator. Click Open. Set the number of points possible per question. Click Submit. A Question Upload Complete screen should appear. Click OK to proceed.
The questions will appear in the test.
NOTE: If an Error message appears, the Word document was not formatted correctly. Make changes and copy past it again into the Test Generator. Repeat the steps again from Section 2.
NOTE: Questions can also be added to a test pool by selecting Pool Manager and following the same steps for uploading questions.
Monday, November 17, 2008
Tip #13: Excel: Charts
Microsoft Office 2007 has removed the chart wizard feature. Charts are now created by a single click on the Office Ribbon’s Insert tab. This new charting feature allows easier customization. Once the chart is created you can modify it to display additional information and data.
Creating a Basic Chart
1. Arrange the data in rows and columns on a worksheet. Excel will determine the best way to plot the data. If you prefer a certain layout, look at the suggested data arrangements provided by Microsoft Office.
2. Select the cells that contain the data for the chart.
3. On the Insert tab, in the Charts group click the chart type, and then click the chart subtype.
NOTE: To see all available chart type, click one chart type, and then click All Chart Types.
4. The chart will be placed in the worksheet as an embedded chart.
Moving the chart to a separate sheet
To place the chart in a separate sheet so that it can be viewed by itself:
1. Click the chart to select it.
2. On the Design tab, in the location group, click Move Chart.
3. Choose where you want to place the chart.
Changing the chart layout or style
Pre-defined chart layouts and styles allow you to instantly change the look of a chart. Chart layouts allow you to change the information displayed and how the information is positioned on the chart. Chart styles allow you to change the chart color and design.
Applying a predefined chart layout
1. Click the chart.
2. On the Design tab, in the Charts Layout Group, click the chart layout you want to use.
Applying a predefined chart style:
1. Click the chart.
2. On the Design tab, in the Chart Styles Group, click the chart style you want to use.
Many more options are available for chart formatting and customization. See Microsoft Office’s Chart Creation for thorough directions on all charting options.
Where can I find more information about Office 2007? The ISS Training site provides Quick Reference Guides and Courseware for Microsoft Office. https://portal.twu.edu/iss-training/appstraining/ms_applications.htm
For additional support, please contact the Help Desk, (940) 898-3971.
Wednesday, November 12, 2008
Tip #41: Adding and removing instructors in your course
Tip: You can add instructors to your course and remove instructors from your course.
Here’s how to do it:
Navigate to your Control Panel and click Enroll User. Search for the instructor’s username by typing the last name and clicking the Search button. Place a checkmark next to the desired user’s name and click Submit. Return to the Control Panel and click List/Modify Users. Click the Search button and click the Properties button next to the instructor’s name. Under Role and Availability, select the Instructor role and click Submit.
To remove an instructor from your course, navigate to the Control Panel and click List/Modify Users. Click the Search button and click the Properties button next to the instructor’s name. Under Role and Availability, select the Student role and click Submit. Return to the Control Panel and click Remove Users from Course. Click the Search button and place a checkmark next to the instructor’s username. Type Yes in the confirmation box and click Submit.
NOTE: You must type Yes, with a capital Y.
Using the Add Users by Role feature:
If you know the Blackboard username of the instructor you want to add, you can use the Add Users by Role feature. Navigate to your Control Panel and click Add Users by Role. Select the role for the user from the drop-down box. Type the Blackboard username(s) in the username box. NOTE: You can add multiple users at once by separating each username with a comma. Click Submit to add the user.
Subscribe to:
Posts (Atom)


